Vray material – maps rollout
First of all, I apologize for any grammatical errors which may be found in this text: P It’s my first translations so please be nice to me ;P I will describe for you with briefly and clearly as to what is in drop-down tab maps. In detail I will only describe those which I use the most, while the rest will be described enough to let you know what they are.
With no doubt, the creation and application of textures it’s a very important element if you want to create a realistic visualization. I must admit that at the beginning my texturing was embarrassing :P I didn’t knew anything about tools in maps rollout, so in my process of “texturing” I was copying the settings from someone who has already had the map set correctly. It’s important to avoid this error, thanks to that you will save a lot of time and nerves.
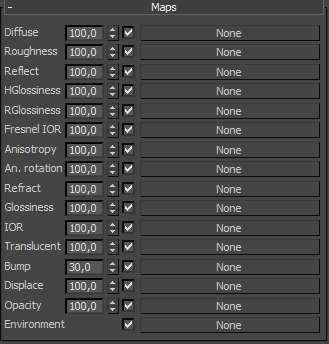
Ok, let’s go with that. You can see right away that the tab Maps is related to the parameters of the material located above. I have to mention that the Vray material has little more slots than the standard map in Mental Ray. Most often I use these slots : diffuse, reflect, bump, displace, opacity. The value next of the map name it’s just a value of the intensity of its action. When you put a texture in to “diffuse” channel and you will set the value on 50 you are able to make that the map will be mixed with the color which you have set above.
Diffuse
As i wrote earlier, in this channel we can add a texture which either completely change the look of the material or will be mixed with the chosen color. Usually i don’t set any other value than 100 because i don’t see the need to mix the colors or maps. When the slot is useful? In the textures of wood, floor, etc. If you don’t have well-prepared texture, don’t use just anything. It’s very important to create a good texture so you have to spend some time creating textures in Photoshop. You can also mix two or even more colors or maps, adding a map called Mix which is shown below on the picture. Don’t forget to set the appropriate percent of the Mix Amount value (default it’s set to 0).

Reflect
This channel is responsible for the reflections on the material. When we will be not using any map, the reflections will be decomposed as an on flat smooth surface. As you can guess, the texture in this slot is necessary when you have some bitmap in the diffuse channel. Important note, to get the effect that you want, throw only black and white maps in to this slot. Why not colorful? Because of that the reflections are more intense for brighter surfaces and vice versa for darker. Logically when you will put a colorful map, program either will become crazy and will be massive chaos with reflections or there will be no reflections.
Bump
I bet, that you will be using this slot very often: P just like me: ) Bump maps are used to simulate the distortion of the material. Keep in mind that this doesn’t work in such a way that, ok now I’m going to throw bricks texture map in to slot and i will have an object that will be convex. None of these things. This works on the basis of the play of lights, when you set correctly the angle of light, inequalities will appear in accordance with the texture map. How to set this up? I won’t answer precisely because you know, you have to try it yourself. Bump map also does not appear, when you set the camera at an acute angle to the surface of the object. The upper limit of intensity of bump maps is 300 units. You have to be desperate to use that value: P I rarely cross the 50th. How to create that kind of map? Soon I am going to share with an entry about creating maps.
Displace
If you want to really distort the object, this slot is for you. However, I would not recommend using it too often. Why? For several reasons. The first of these is the fact that you need to create very good texture having regard the edges, otherwise each object wall will impose on each other at those edges. The second reason is when you will use to high value to that kind of maps; the render time will be much longer. Setting it to 100 will extend the render time so much that you can go on a trip :D. So start from a low values 2-3 and gradually increase it but! Only if you really need to have a map in that slot. The third reason is that you can do it much better by using Vray Displacement modifier. What happens is that the first you have to unwrap our object and export the map. Then we have to create texture in PS and finally throw it into to modifier. Definitely it is too complicated for the beginning :P
Opacity
What happens is that the surface of the object is only visible there where texture have the white color. So, for example, as we have a plane surface and we will give him the material with opacity map suppose the leaf, and then when you will render your scene, the plane surface will be in the shape of that leaf. This is useful mainly when you are going to create different kinds of trees or plants. This can save the massive number of polygons, it’s easy to guess that when you have a large number of plants it is an incredible savings. The hitch is that the opacity works best on flat objects such plane surface, in the more complicated kinds of objects the effect will not be like you expect: P
Now briefly about the other slots, which I do not use at all or very rarely.
Roughness – here you can add a map, which increases the surface roughness of us. As I mentioned in the previous section, I rarely change the value in the Diffuse panel so I almost never throw in here any map.
HGlossiness i RGlossiness – as for me, the settings in Reflect panel are often sufficient to get the proper reflexes. However, if anyone would like to have more control over the reflections , we can try to create the appropriate map in Photoshop.
Fresnel IOR i IOR – honestly I don’t recommend adding anything here, the settings are sufficient. Alternatively, you could use any of the ready-made maps in the program.
Anisotropy – I like the above, it is enough to play with the parameters of the BRDF panel. The sooner you learn to embrace those setting, the better for you, because the texture and additional maps can slow down rendering process.
Translucent - don’t confuse with Transparent slot! This slot is responsible for light clearance through the object. Objectively, I do not know what to fumble here after seeing options in Translucency. But it’s just my opinion ; )
Environment – it’s used to set the texture which that material will bounce back. So i don’t know what is the point to set different Environment map to different material but ok. One environment texture for all of objects in the scene you can set in the render options(F10 key) in V-Ray tab and then in V-ray: Environment.